Wonder Horse repaint: March 2021
Clip Clop the Wonder Horse comes from the 70s. He was found in the trash, or perhaps a yard sale, without his original frame and bouncy springs. He was in pretty good shape, other than missing the accessories. For years, he hung in the garage, from his leg pegs, waiting for a place to go. He finally migrated to my bedroom. Wasn't sure whether to leave him vintage or repaint him as many artists do to primarily Breyer models. His original paint job was so horrible though, it was clear he'd need repainted. The sculpt was fabulous, clearly the artist knew what a horse looked like and stylized it nicely, but the paint job was done quickly in a factory with airbrush... and everyone was coloring outside the lines.
And after a year of covid hermitage, I finally got around to doing something about rehabbing this pony.
And after a year of covid hermitage, I finally got around to doing something about rehabbing this pony.
Ripped out the clip clop box. Covered it in Gorilla tape. Painted over it. Decided not to drill holes and make a carousel horse. The blue "saddle blanket" looks more like the actual saddle skirt, so it was painted to match the rest of the saddle.
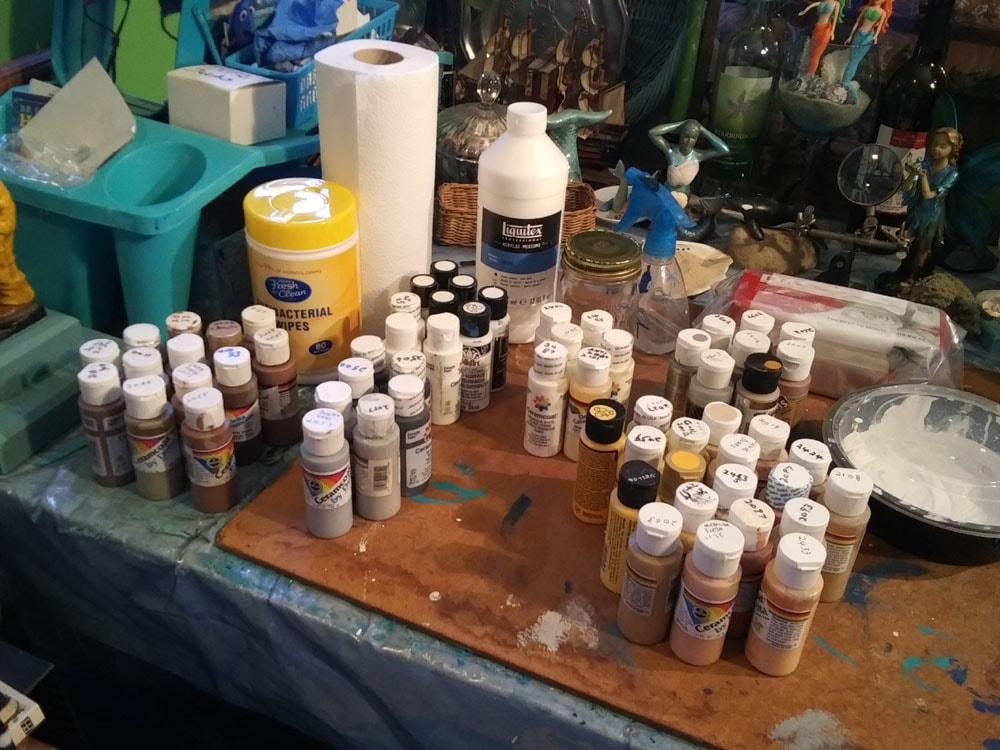
Craft Paint Stash
Acrylic craft paint inherited from my uncle (see "Uncle Bob's Toys" on this site). Ceramcoat, Folk Art, Americana. Liquitex gesso as primer. Paints grouped by color: chocolate browns for bay base, golden and cream tones for buckskin color, whites and creams and greys for white areas, pinks and taupes for mouth, greys and shell colors for hooves, blacks for points (mane, tail, hooves). I used various ex-food containers to house custom mixed colors as I went along. Check out my pages on acrylic painting here: acrylic painting.
Base coat of deep chocolate bay. Painted eyes in base colors. White is still just primer. There are about three or four coats of primer. Chalk paint would also work as primer, it sticks to everything, including plastic.
Not chalkboard paint, CHALK paint.
The color and pattern is based on a number of Chincoteague ponies. The Wonder Horse was originally a terrible version of a buckskin pinto, so I decided to keep him that color, but make it authentic.
I have a lot of photos of Chincoteague ponies myself, but also used DSC Photography's identification website for reference. A buckskin pinto stallion named Tidewater Twist is the main inspiration, but I modified his markings as if this were a colt or filly of his. https://www.dscphotography.net/
Pinto is a color pattern, Paint is a breed.
The ponies of Chincoteague come in bay, black and chestnut (red genetically, aka sorrel or chestnut), some with a cream gene that creates buckskin (on a bay) or palomino (on a red), or smoky black (on a black). Double cream gene creates a pale sand "double dilute" (perlino, cremello or smoky cream) ...all of which look similar and cannot be told apart without genetic testing.
The pinto patterns are tobiano, splash and sabino. Cat tracks appear on some homozygous tobianos. Some tobianos also show a bit of roaning (different from the genetic roan color). Tobiano basically looks as if someone has poured white paint from the topline of the horse. It often has white stockings or entire white legs.
Most horses have brown eyes. Some dilutes (champagne, double creams) have hazel or blue eyes. Some pintos, or horses with white markings near eyes, have blue eyes, or one blue eye. I have seen at least one solid bay Chincoteague pony with blue eyes. I had a pony with one blue and one brown eye.
Most horses have black skin, visible around the muzzle, eyes, and parts of the face where the hair is fine and short. Under white markings, skin is pink or shell colored. Champagnes have freckled skin, as do Appaloosas. Dark hooves go with dark legs, shell color hooves go with white feet or legs.
Begin to use various shades of cream, grey and white to do white patches: white on raised areas, greys in lower areas of muscling. Work on eyes. Shading on legs. Silver on conchas and bridle. Saddle began with basic chocolate. I added a wash of watered down black working it into the carving with a brush, then wiping off the raised areas, leaving the shadowy black in the low areas. Later I drybrushed a lighter brown over the high parts of the carving.
I originally was going to drybrush layers of progressively lighter golden tones over the chocolate bay base to create the buckskin color. It looked awful.
So I treated the 3D pony like a flat acrylic painting:
I detailed the edges of the bridle and saddle with dark paint.
The blue eye needed a lot of work to make it look normal. Both eyes got highlights in white, and a layer of ModPodge gloss for shine.
The body of the pony is left the satin flattish finish of the paint.
The sand dollars on the pony's neck cover the stupid handle holes (I HATE neck handles on hobby horses and always have since I was a toddler, you hold the reins not stupid neck handles!!!). The sand dollars came from a giant chocolate chip cookie decorated in a mermaid theme. They are rings, meant to be worn by kids. The ring part fits right into the hole.
The white frosting on the black part of the mane is typical of many buckskins. The version most kids have seen are the Fjord horses in Frozen whose manes are cut to stand up, and have heavy white frosting on the outside and dark color in the middle.
The tail is typical tobiano: "eagle feather", white on top, dark on the bottom.
Muzzle is dark skin showing through, except for pink in white snip, and at end of white blaze. I worked a lot of minimally loaded brush (not much paint on brush) into dampened surface (dry paint, but sponged water lightly over surface)... wet into wet... to blend colors smoothly.
And don't be afraid to use your fingers to blend!
So I treated the 3D pony like a flat acrylic painting:
- you can paint wet into wet: a brushful of wet paint into wet paint on the surface, easy to blend, but acrylic dries fast, which is why I like it. I also make heavy use of a hair dryer.
- You can paint wet into dry, or dry into dry (drybrush). A drybrush is barely loaded with paint and gives you hair and grass textures. The surface you are painting is dry.
- You can paint wet into wet after the paint dries: first sponge or brush water onto the dry surface. The painted surface of the horse is dry, but now you have lightly added a layer of water... paint into that. It allows you to blend layers of new color over the dry paint.
I detailed the edges of the bridle and saddle with dark paint.
The blue eye needed a lot of work to make it look normal. Both eyes got highlights in white, and a layer of ModPodge gloss for shine.
The body of the pony is left the satin flattish finish of the paint.
The sand dollars on the pony's neck cover the stupid handle holes (I HATE neck handles on hobby horses and always have since I was a toddler, you hold the reins not stupid neck handles!!!). The sand dollars came from a giant chocolate chip cookie decorated in a mermaid theme. They are rings, meant to be worn by kids. The ring part fits right into the hole.
The white frosting on the black part of the mane is typical of many buckskins. The version most kids have seen are the Fjord horses in Frozen whose manes are cut to stand up, and have heavy white frosting on the outside and dark color in the middle.
The tail is typical tobiano: "eagle feather", white on top, dark on the bottom.
Muzzle is dark skin showing through, except for pink in white snip, and at end of white blaze. I worked a lot of minimally loaded brush (not much paint on brush) into dampened surface (dry paint, but sponged water lightly over surface)... wet into wet... to blend colors smoothly.
And don't be afraid to use your fingers to blend!
