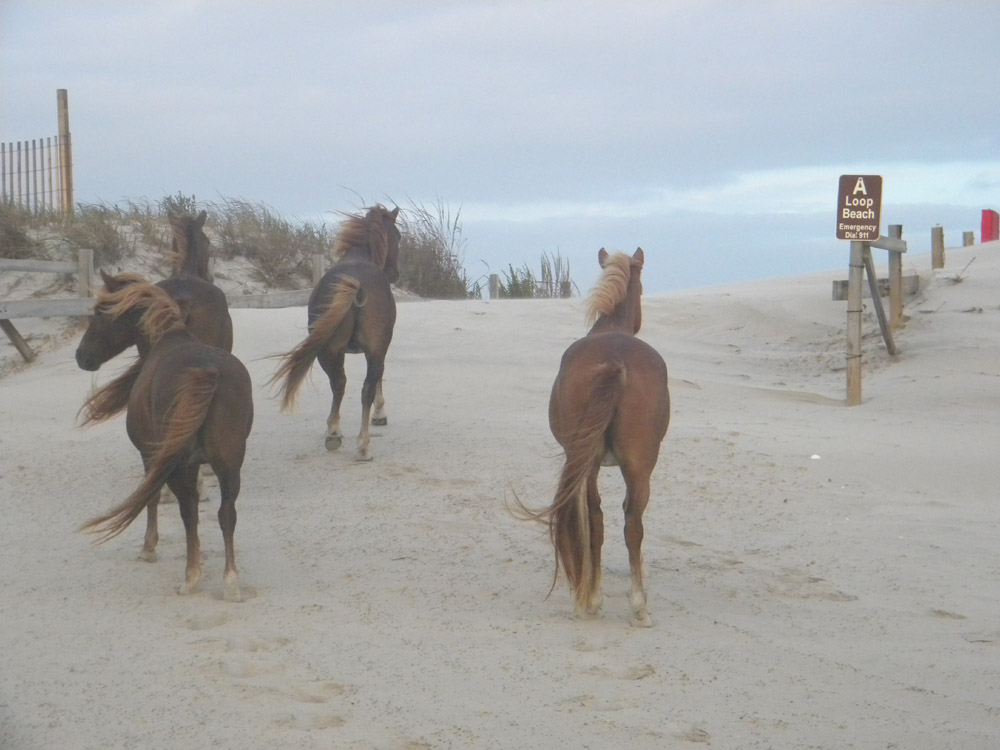
photographing the wild Breyer horse in its natural habitat
a teeny tiny tutorial on stuff I learned while trying to get horses to stand up in a sandstorm
and throwing buckets of water and rocks at them
I've collected model horses since I was four...and that was 1959. Breyer is the largest and best known of the model horse companies, but there are other vintage collectibles like Hartland, and modern companies like Safari and Schleich doing cool stuff.
There is a massive collection of collectors of model horses, and many photograph their horse models like you would real horses. There are also youtube videos, often kids creating stories with their horses like I did when I was a kid (but we didn't have youtube then).
Modern collectors often repaint, re-position and re-sculpt already beautiful sculptures to make unique individual horses which they show in model horse shows (live or photo).
Don't let your collectibles sit on a shelf, honor the artistry and beauty of these great models, tell a story, take them off the shelf and have fun.
first, the basics...
1. Generally line the horse up parallel to the plane of the camera/phone (especially if shooting a "portrait" for a model horse show). This prevents hugeass or huge head syndrome. Try other angles tho, just to be sure what the best angle is. Depending on how the model is posed, it may look better with the camera slightly to the fore or rear of the model.
2a. Distance from the camera: shooting close up vs shooting farther away with a zoom (and cropping later) creates different perspective... the model, especially in relation to the background, will look different. Try several distances. "Forced perspective" has been used in many films (Hobbit, LOTR are good examples, where human actors had to appear both six feet tall and 3'6"). Basically, something closer to the camera will appear larger, while something farther away will be smaller.
2. Shooting outside on a grey day or dusk/dawn is helpful (not direct sunlight which creates harsh shadows). Also open shade. In the shade, but not under a green tree or in light reflected from a colored wall (red brick, blue house).
3. Shoot shiny (glossy) horses in open shade, or lower light situations. Under an umbrella, with non reflective backgrounds that won't show up on the horse.
4. Generally stay at the eye level of your model. Lay on the ground, put the model on a table (you can use sand or other diorama methods to create a natural setting), or sit on a beach chair and lean over with the camera. You can do aerial shots (high angle or you standing up with horse on the ground)... they will look like drone or airplane shots.
5. Shoot many angles, lighting settings. It's digital. Overshoot, then delete.
6. CHECK YOUR FOCUS. Did the bloody camera just focus on the background again?
7. Use your natural backgrounds. With the camera close to the horse, that fence, field, barn far enough away will be to scale with your 8" tall horse. You can shoot for blurred background, or sharp... just be sure your models are in focus.
8. Beware light horses on dark backgrounds or dark horses on light backgrounds. The camera will average the whole pic and wash out the light horse or turn the dark one into a silhouette. Change your light settings or change your background. Pintos are an especial issue. Make sure BOTH colors are defined and not washed out.
9. Beware white balance. Is your camera turning the white horse (or the white bits on the pinto) blue? Or yellow? Adjust your white balance.
10. Make a photo tent; a smol white tent to place models in... it reflects light all around the model. You can also use white reflectors (a towel draped over a gallon jug, a kitty litter container, just look around) like they do in movie making. It fills in the shadows and eliminated stark black and white lights and darks... more even lighting. Reflectors can be used outside on nature shoots.
11. Use a white card held against the model to help camera with white balance (and adjust the camera settings). Use a grey card held against the model to help with light/Fstop settings. Use a printed card (like a flyer or map) to make the bloody point and shoot focus on the pony not the background.
location location...
|
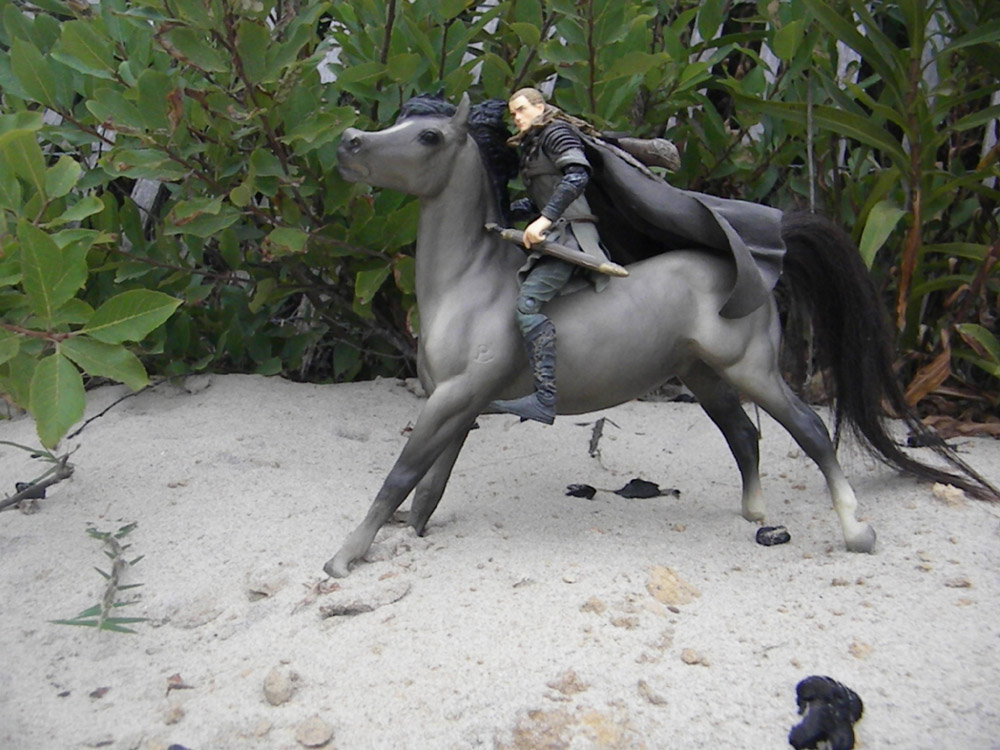
you want this...
|
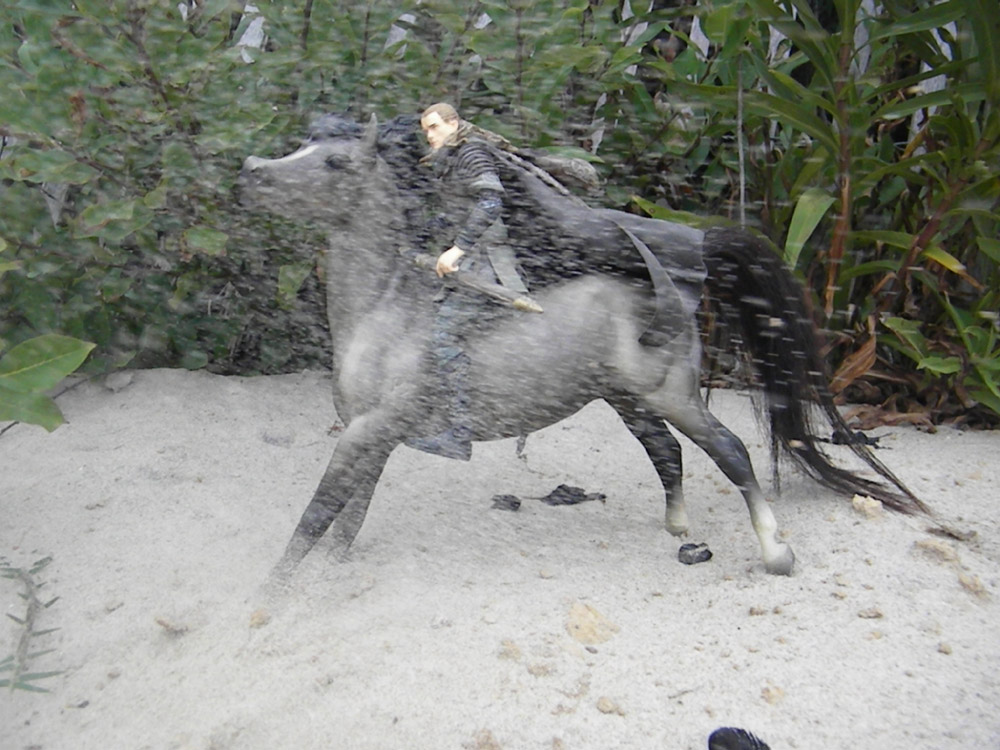
you get this...
|
|
|
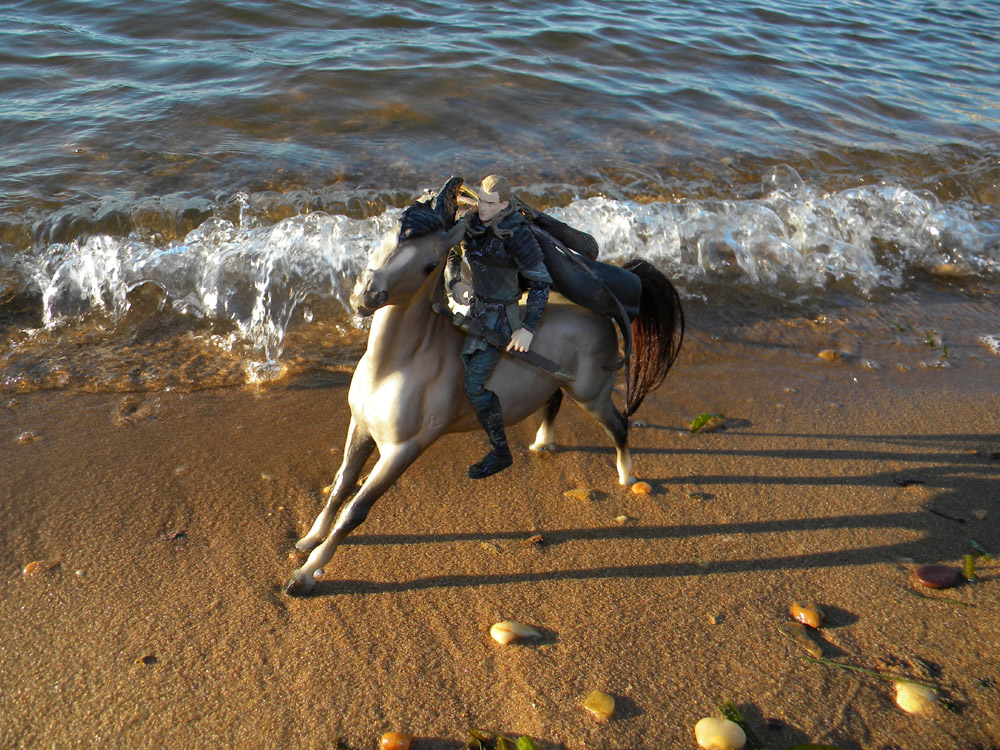
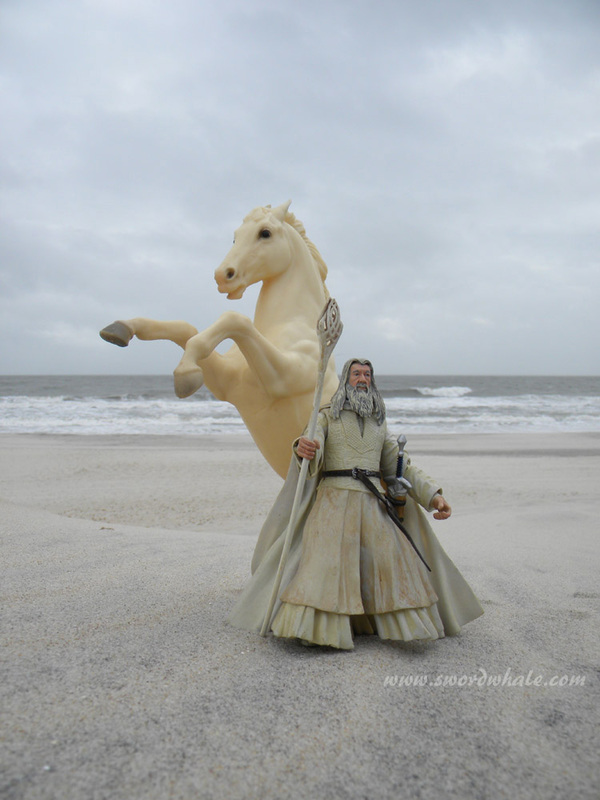
...because you are on Assateague Island on the edge of the North American continent and the wind is gusting to gale force on the beach...
OK, I threw a handful of sand in that last one, but it was a total sandstorm below the knees and the horses kept blowing over. This can be annoying... it can also be a useful effect. Blowing sand looks great and authentic in your shot. Spray bottles can create scale rain or mist.
OK, I threw a handful of sand in that last one, but it was a total sandstorm below the knees and the horses kept blowing over. This can be annoying... it can also be a useful effect. Blowing sand looks great and authentic in your shot. Spray bottles can create scale rain or mist.
|
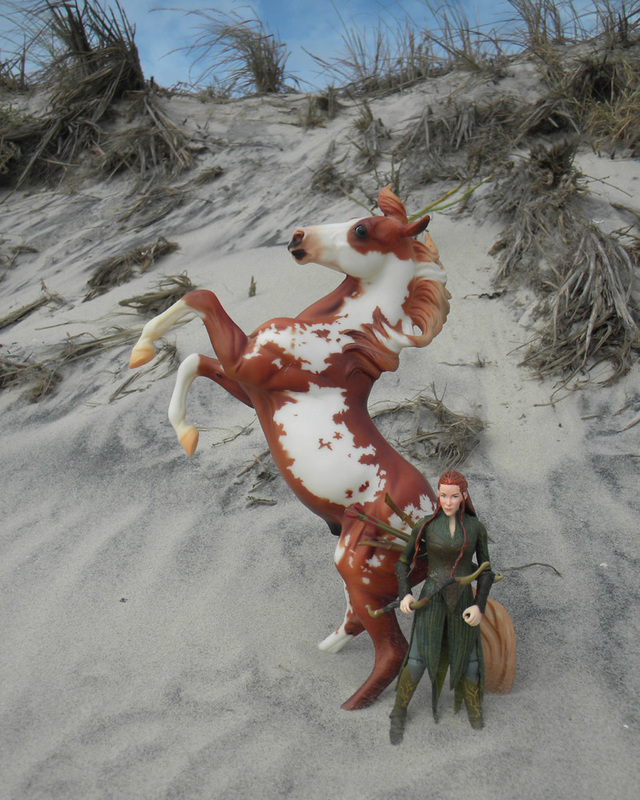
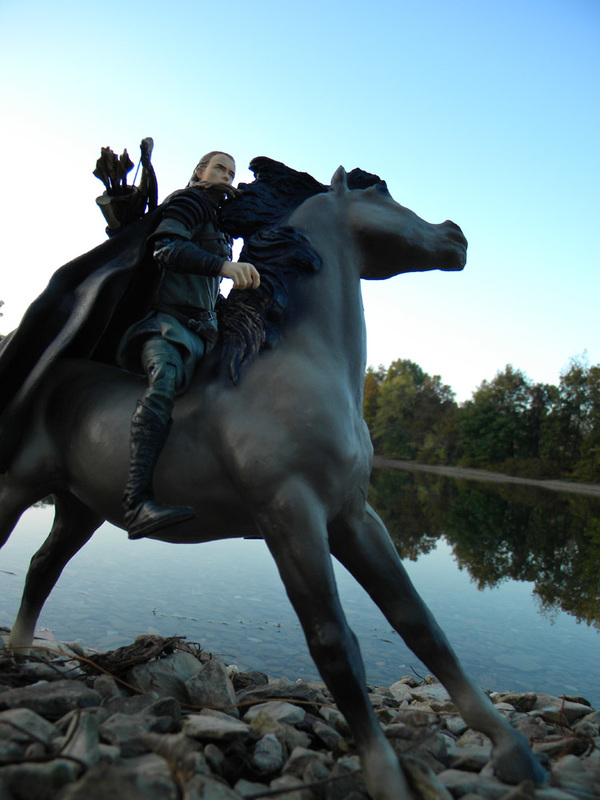
Use your landscape. The sand here had a wonderful rippled effect (two kinds of minerals, light and dark, sorted by the wind). The beach grass is blowing, which adds to the effect of the running horse and the flying cloak. You can see the ground blizzard against the horse's legs! Breyer's Smokey (aka: Arod, here with Legolas) is in a perfect pose for dancing down a slope.
|
Do not fear the closeup.
Mud and stuff: don't forget, your hero has been travelling and probably has sand/mud/whatever stuck to his boots/cloak/whatever. His horse is really clean. Self cleaning horse. a friend once said "fantasy is a clean white horse". |
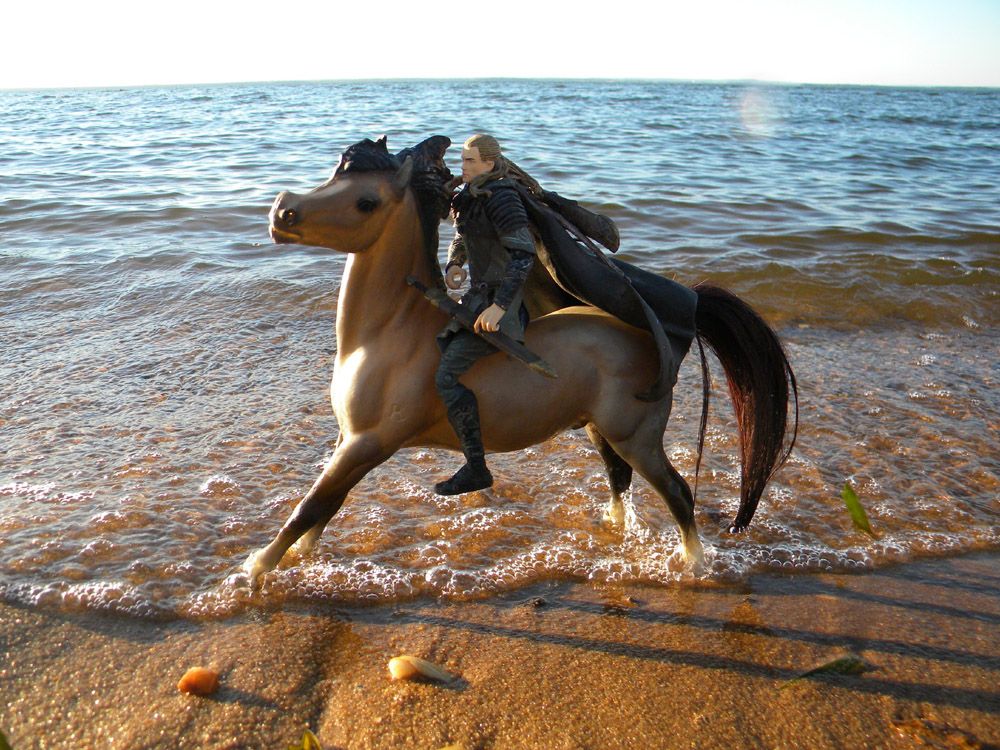
What's your eye level? Staying at the eye level of the models makes them look more real. Going into aerial mode often makes them look like ... well...models.
This is my backyard. Ho hum. Also, grass is out of scale (too big). 
|
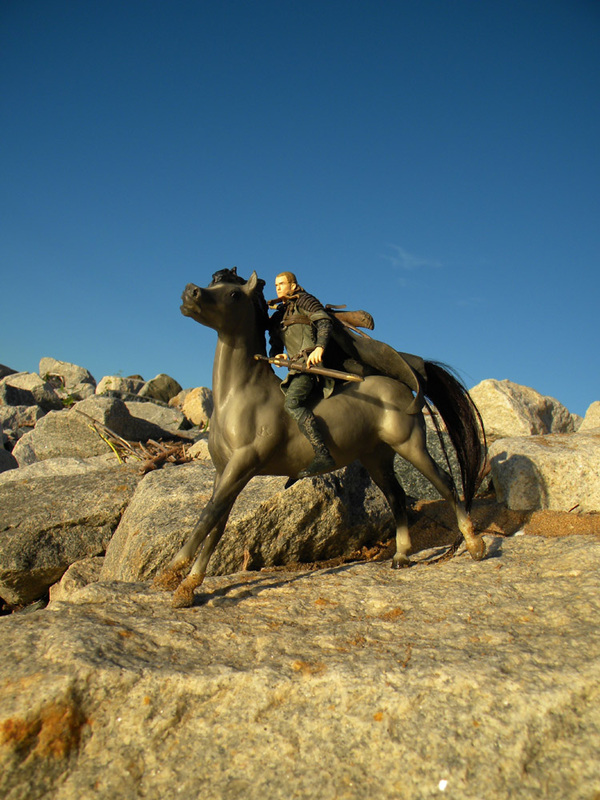
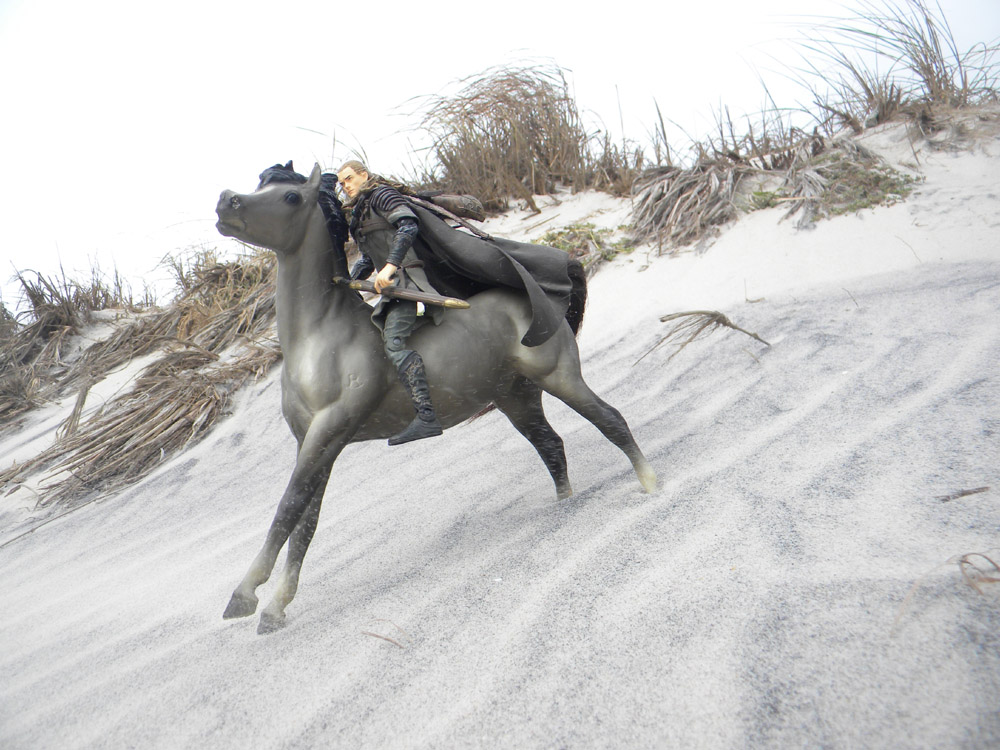
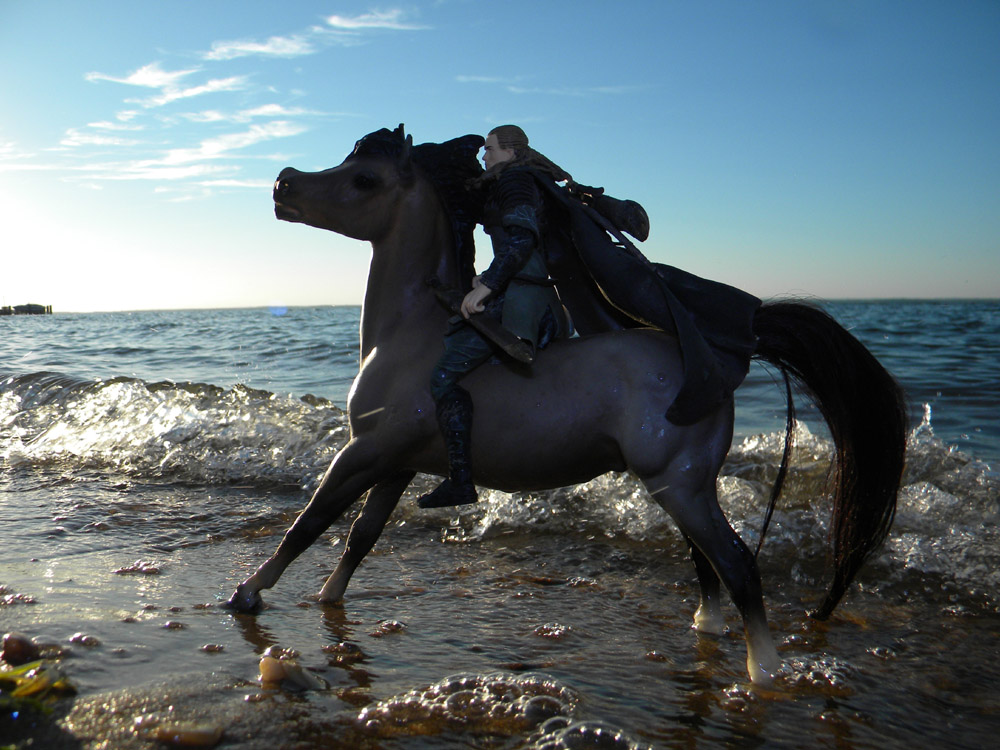
Legolas and Arod look more epic when photographed from a low angle... the cliff doesn't hurt either (rip rap rocks at Betterton Beach MD).
Water has scale. While the water looks a little gloppy in the aerial shot (small waves close to the model) here the ripples are farther out. The bubbles are a wee bit large, but not obtrusive. This is the same backyard, looking the same direction. This is the tree you can see in the top left corner of the photo to the left. 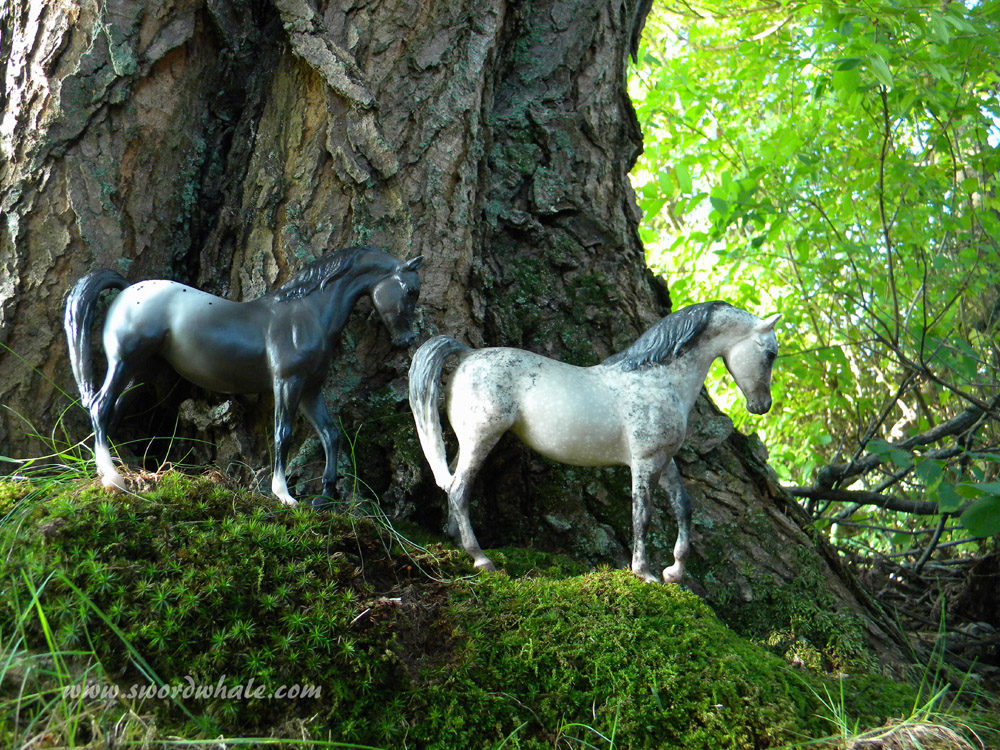
|
Same time, same sunlight, same direction, same tree. I just moved closer to the tree and found a whole new landscape under it.
practical effects
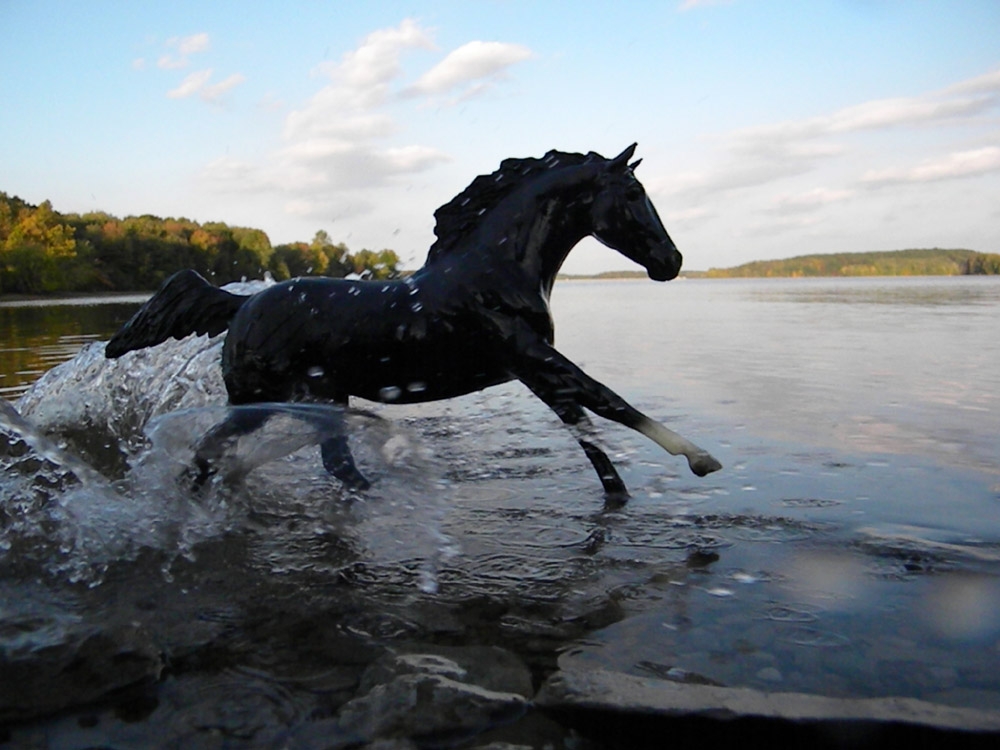
A horse moving through water, or across sand or dirt or snow is going to kick up some stuff. If you were doing a diorama, you would use cottom wool, or polyester fluff (like the stuffing in plushies). On location, you might do that, but it's fun to do real practical effects. Oh and WATER HAS SCALE. Be careful your 12" characters aren't surrounded by Mystery Globs or Magic Missles rather than water splashes.
*kneels on rocks, doing weird yoga poses, with one hand on camera, shutter half depressed...
OH FERKCAMERA WUT ARE YOU DOING NOW?!?!? as it goes into rando mode, because I am holding it with one hand and have hit the Mystery Button...
poke poke poke...camera is now trying to...WHAT ARE YOU DOING?!?!?
Finally gets camera to behave...
flings water, hits continuous mode...
flings water, throws rocks, splashes.. repeat, repeat, repeat...
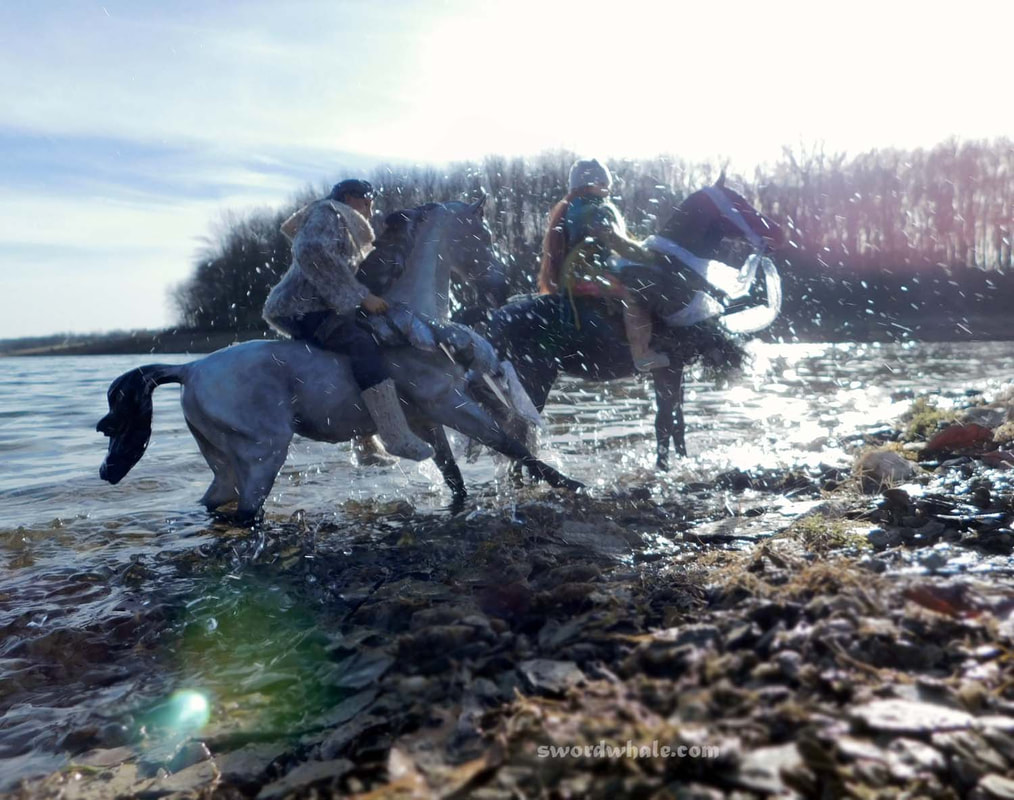
I will also mention this is December in Pennsylfreakinvania and the water is about 39 1/2 degrees F... (that's 4.1666666C for the rest of you).
and my custom horses are standing in water and mud...
In the end you will have shot several dozen shots and gotten one good one. And you'll still have to photoshop it because it's backlit, and you need to darken up the subjects.
Click through the pics in the slideshow, it looks like stop motion... because that's what the camera is doing, shooting a very short film clip.
These are characters from my Earth Life Foundation/Hawk Circle Farm stories: Bran and Rainger Murphy. Part of my elf on a shelf challenge for 2023 (I don't know what that stripey stockinged critter is but it is NOT an elf). These are 1/6 scale Johnny West/Marx horses (Flame and Thunderbolt, repainted) and customized Barbie scale (1/6, 12") dolls. I made tack, wreaths, sweater, boots. hat.
I do believe in helmets, especially with rocks underfoot, but elves land on their feet, and the black horse is probably a pooka or something and won't let a rider fall.
Lake Marburg, Codorus State Park PA, December.
*kneels on rocks, doing weird yoga poses, with one hand on camera, shutter half depressed...
OH FERKCAMERA WUT ARE YOU DOING NOW?!?!? as it goes into rando mode, because I am holding it with one hand and have hit the Mystery Button...
poke poke poke...camera is now trying to...WHAT ARE YOU DOING?!?!?
Finally gets camera to behave...
flings water, hits continuous mode...
flings water, throws rocks, splashes.. repeat, repeat, repeat...
I will also mention this is December in Pennsylfreakinvania and the water is about 39 1/2 degrees F... (that's 4.1666666C for the rest of you).
and my custom horses are standing in water and mud...
In the end you will have shot several dozen shots and gotten one good one. And you'll still have to photoshop it because it's backlit, and you need to darken up the subjects.
Click through the pics in the slideshow, it looks like stop motion... because that's what the camera is doing, shooting a very short film clip.
These are characters from my Earth Life Foundation/Hawk Circle Farm stories: Bran and Rainger Murphy. Part of my elf on a shelf challenge for 2023 (I don't know what that stripey stockinged critter is but it is NOT an elf). These are 1/6 scale Johnny West/Marx horses (Flame and Thunderbolt, repainted) and customized Barbie scale (1/6, 12") dolls. I made tack, wreaths, sweater, boots. hat.
I do believe in helmets, especially with rocks underfoot, but elves land on their feet, and the black horse is probably a pooka or something and won't let a rider fall.
Lake Marburg, Codorus State Park PA, December.
water
|

|
|
|
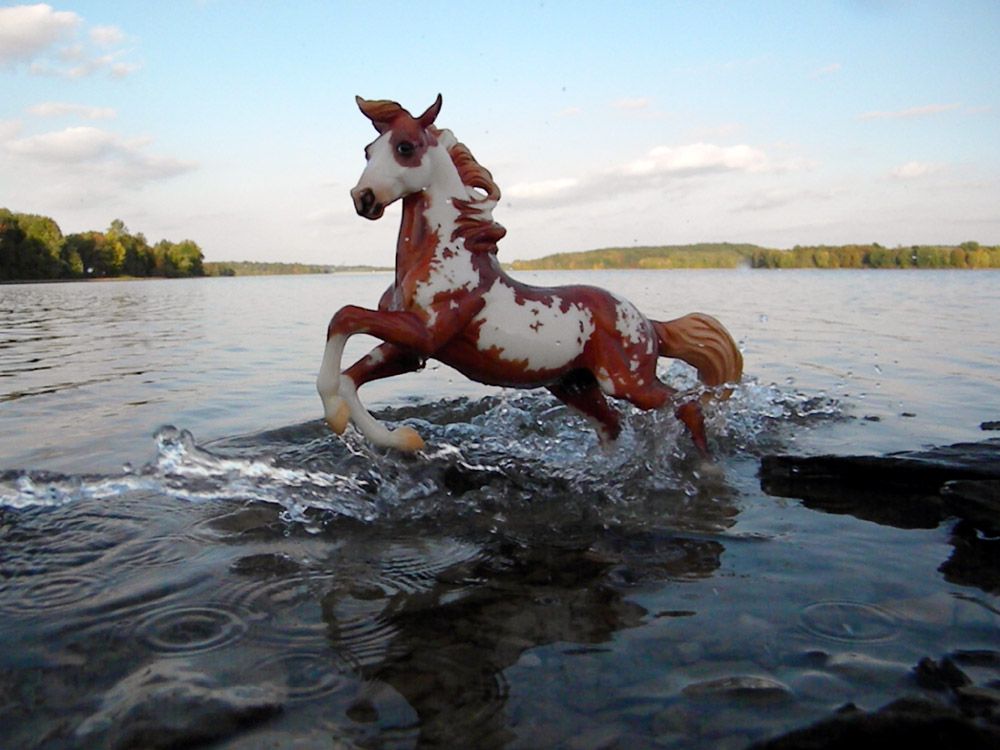
To get these effects along the shores of Lake Marburg I threw rocks, bowls of water and wiped a lot of water off my camera. I used continuous mode on my Nikon Coolpix L100 to capture the motion. You could shoot video and do a screencap though the quality would be less. Be prepared to shoot a lot of pics. Remember: water has scale! (see derps below). You can also use a spray bottle to get water effects.
frozen
Breyer traditional scale models shot on a snowy table at my friends' place. You just throw snow at them while holding the shutter (on sport continuous mode) after focusing by holding up an Eastern Neck Island waterproof map in front of the horse, then pressing the shutter while getting a handful of snow dry enough to fling...
Seriously: the first thing is to stick your camera on a tripod (or other snowproof and immobile surface). In this case I had two snow covered tables outside, facing the lovely valley of the Conewago Creek. Working on the ground would have been harder on me, and harder to stabilize the camera. This snow was generally wet and mushy (no good for flinging) but it was late and it was starting to set up and get crunchy. The snow on the tables powdered nicely. I used the Eastern Neck map (a piece of mat board would be better, in a color closer to that of the horse) because it was what was in the van and it was darkish, allowing the camera to focus on it and get the exposure right rather than underexposing due to the snowy background. I focused on the map (held against the horse), tossed the map, grabbed a handful of snow, scrunching it up to powder, meanwhile keeping the shutter release at halfmast (chirp chirp), then pressed the shutter all the way and flung the snow. Make sure you're flinging the snow in the right direction, one that makes sense with the direction the horse is "moving".
light
Assateague Beach, cloudy day, everything's pale but the sand is reflecting light evenly onto the subjects.
Below: epic lighting... except for that hard edged unnatural looking shadow... maybe it's a mountain. Also, don't get your own shadow in the pic. |
Assateague Beach, less clouds (note blue sky at top), beaches and snow are hard to shoot on: set your exposure carefully: the camera will tend to underexpose things while compensating for the brightness of the sand/snow. With automatic cameras point at the darker object if you don't want it underexposed or change the settings.
|
Backlighting can be fun... just be sure you have enough light on the subject ... or plan to make it a silhouette. Use a reflector (any light object) to throw light on the subject.
|
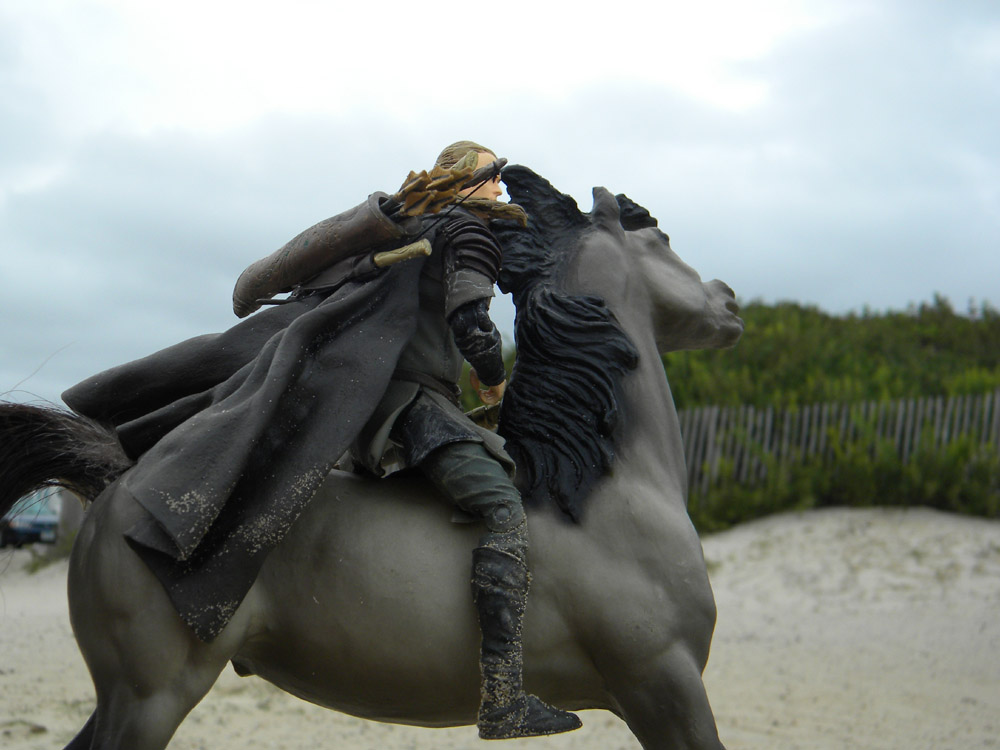
Also a bit of low angle shooting on these two. 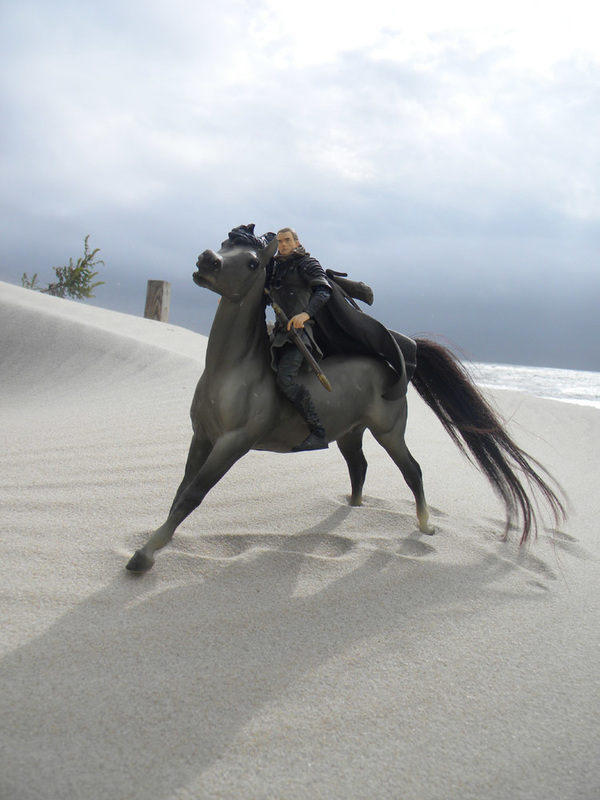
|
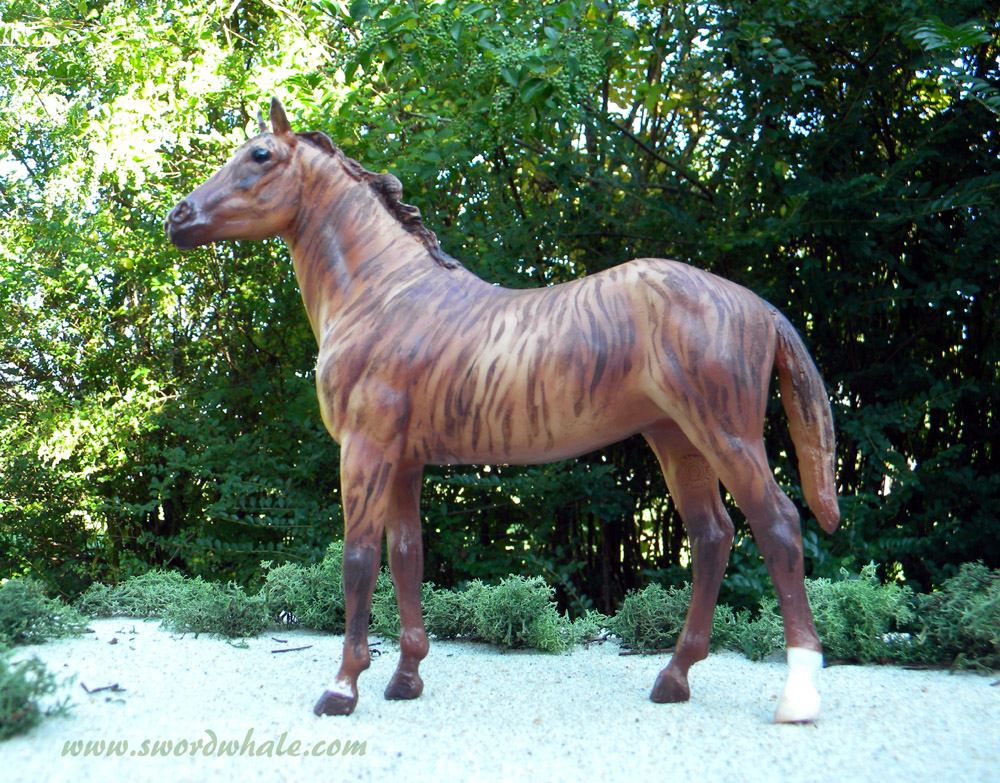
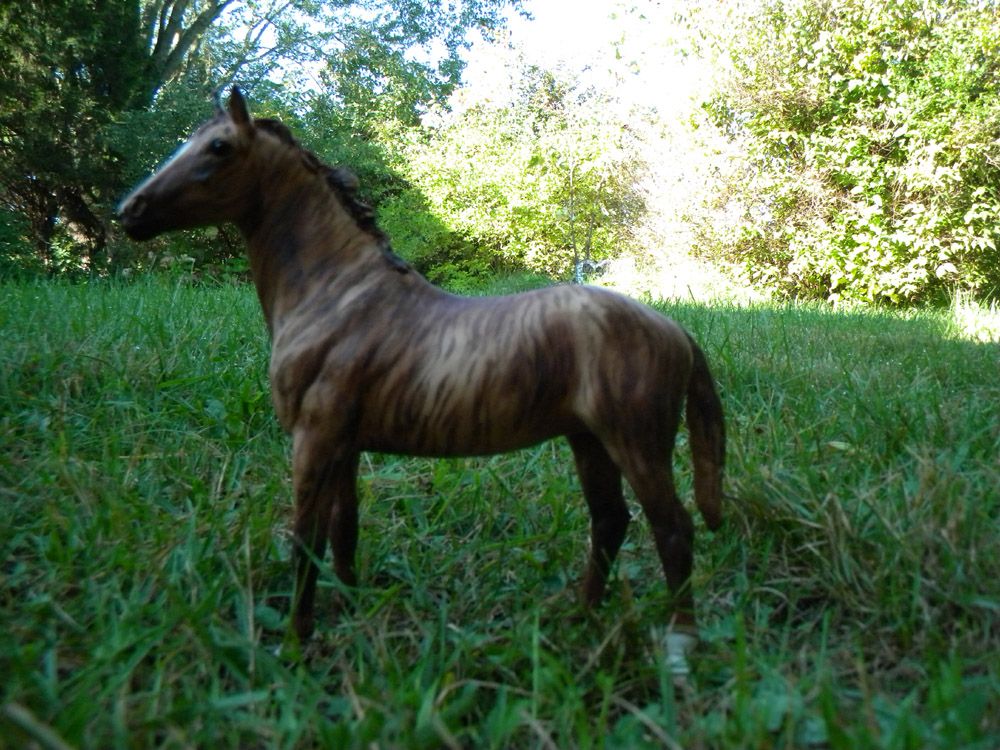
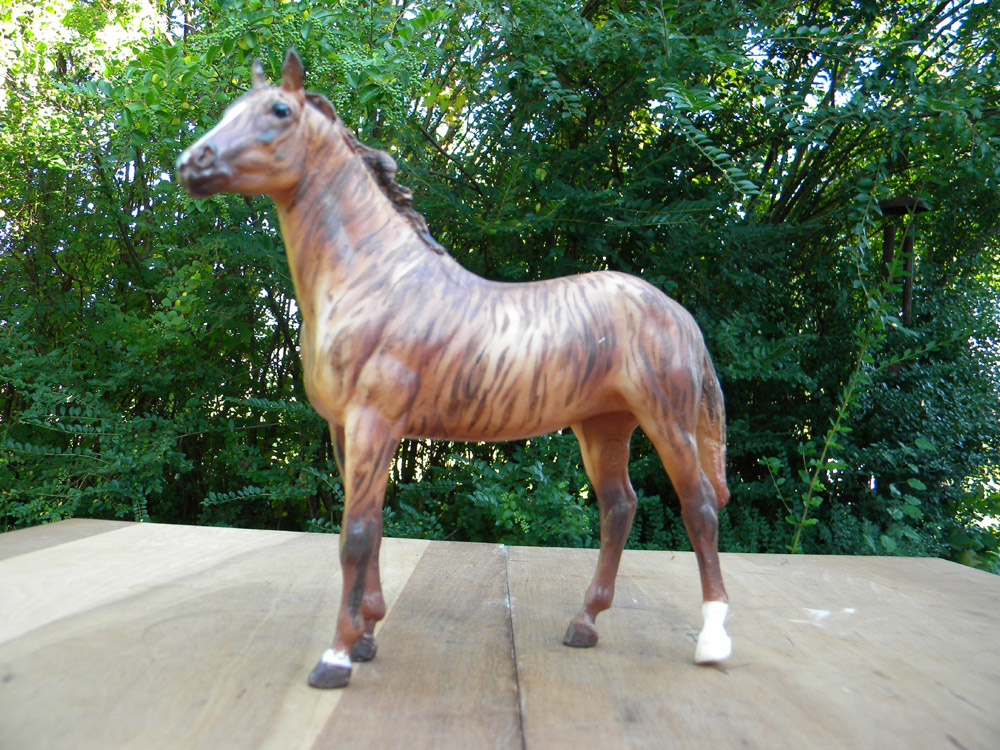
My brindle (a chestnut classic "Duchess" painted by me) mare looks totally different when photographed in open shade (shade, but with plenty of light bouncing off something, like a wall) against a white wall vs in the shade of a privet hedge (on a table with sand and reindeer moss). Beware open shade with red (or blue or yellow or whatever color) wall; it will affect your color balance. Photoshop is my friend.

|
|
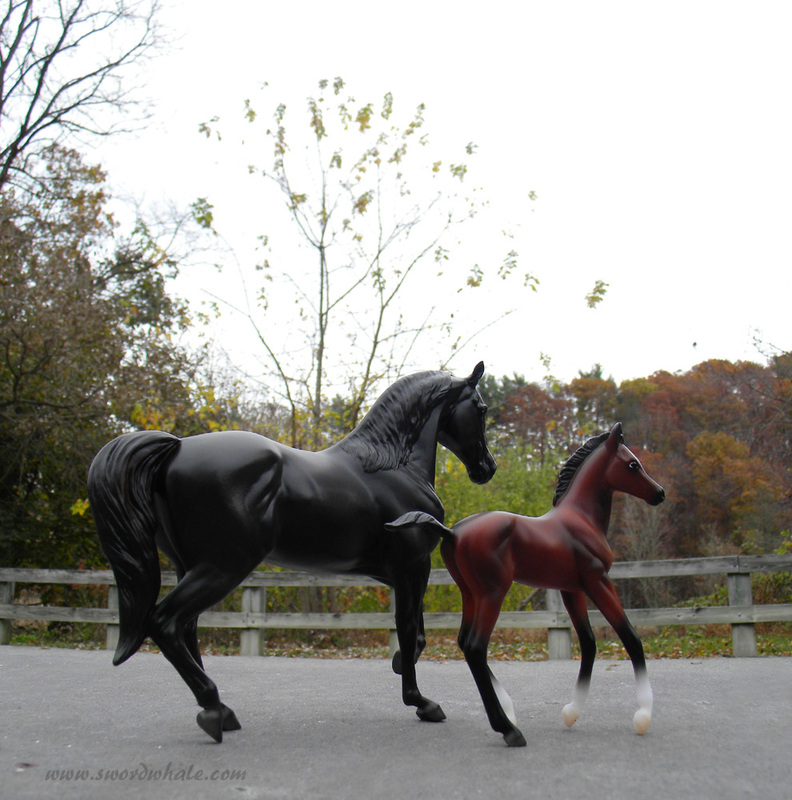
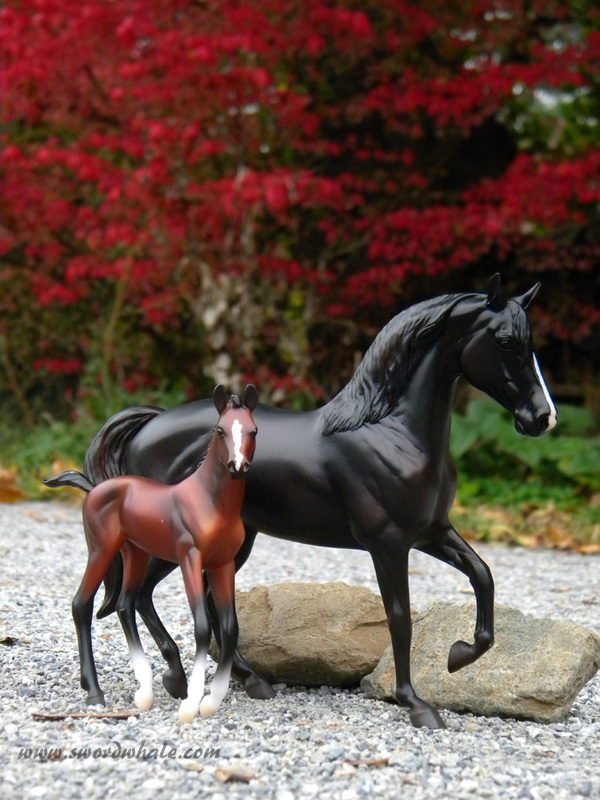
One black horse (and a bay filly) in the same spot on the Rail Trail gets me a variety of lighting. Very dark or very light subjects are more challenging. Pay attention to how your subject is catching the light. Shoot different exposures if possible.
your focus needs more focus
(Jackie Chan: The Karate Kid)
That moment on Photoshop when you converse like a mariner because the %*%^!! autofocus camera focused on the background and not the horse. An SLR with a lens YOU focus is easy, but the usual pretty good autofocus cameras need to be coerced into focusing on the right stuff.
You can hold up a piece of paper. mat board, grey card (30% grey camera card for exposure setting), your handy wildlife refuge map (been there) or similar object in the correct position and focus the camera on that. It should NOT be a piece of white paper; not only does the camera not want to focus on that, you'll get the wrong exposure. A piece of paper with type or squiggles works. Grey card, better. Camera on tripod or beanbag is best, then camera does not move between focusing and shooting. Your viewscreen is probably too small to check if yoru shot was focused, but if you can zoom in (blow up your preview) to check it do. It's too late to re-shoot when you've taken down your whole setup.
You can hold up a piece of paper. mat board, grey card (30% grey camera card for exposure setting), your handy wildlife refuge map (been there) or similar object in the correct position and focus the camera on that. It should NOT be a piece of white paper; not only does the camera not want to focus on that, you'll get the wrong exposure. A piece of paper with type or squiggles works. Grey card, better. Camera on tripod or beanbag is best, then camera does not move between focusing and shooting. Your viewscreen is probably too small to check if yoru shot was focused, but if you can zoom in (blow up your preview) to check it do. It's too late to re-shoot when you've taken down your whole setup.
Below: typical bad focus. The classic sized (really short) foal is a blur blob while the surf is just fine. 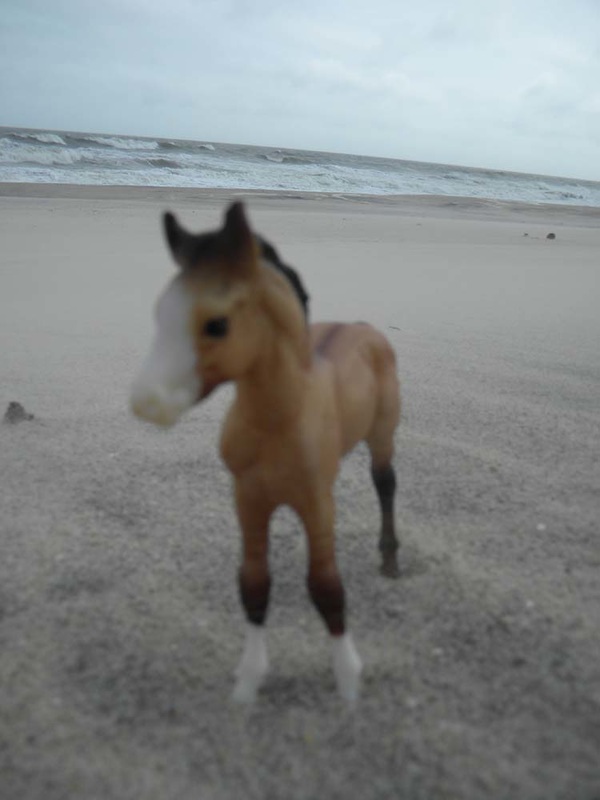
On my Nikon Coolpix L-100 I used the close-up mode, the regular mode, and landscape mode. All got randomly blurry horses and sharp backgrounds until I made sure the camera had a flat object to focus on. Rocks (about 30% grey) also worked. The shiny black horse at an angle, not so much. Fill lighting or a reflector would have helped here too.
|
Just slightly out of focus (could be fixed on Photoshop), slight enough to not notice on camera's viewscreen.
Below: sacrificed a bit of sharpness in the surf for clarity in the foal. I could have Photoshopped a sharp background and a sharp foal together. Now you can see the blowing sand too. (Assateague Is.) 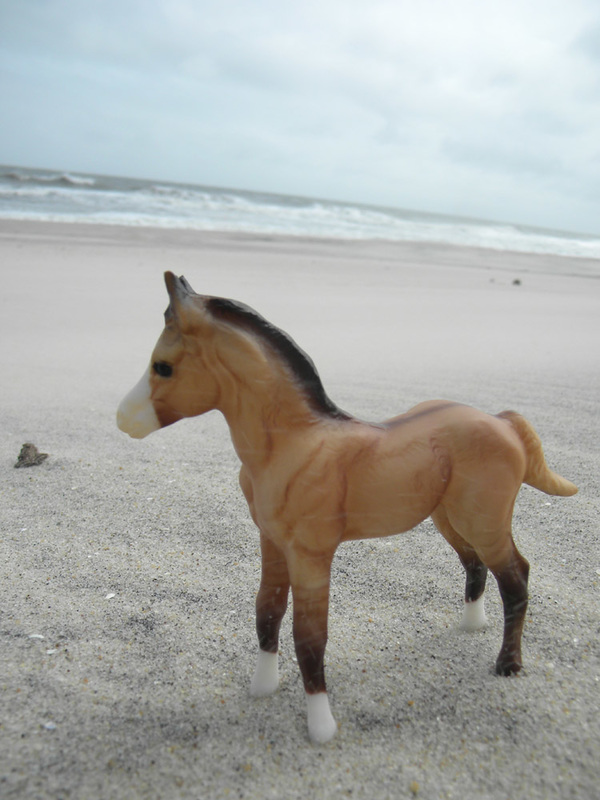
My autofocus camera wouldn't focus on the classic Morgan mare and foal... until I inserted a flat leaf. Focus on leaf, remove leaf, don't move camera (tripods help), shoot. Beware if leaf and horse are different shades, you may have underexposed. A general rule is; thing you're taking your light reading from is 30% grey.
|
Below: grey card behind models focuses autofocus camera.
These very small Breyers (Stablemates series) are difficult to photograph. I needed to put them on a table to even get the camera to their eye level. I used sand and reindeer moss to create a foreground. You could also glue the moss to a board, it won't blow off. Mixing ModPodge and sand to create nice permanent sand that won't fall off is also good. I tried landscape, regular and closeup modes. Closeup seemed to work well but often I needed to focus on a grey card. The background is slightly out of focus, which is fine. Shot on location at Hanover Junction on the York County Rail Trail. The trees are real fall trees.
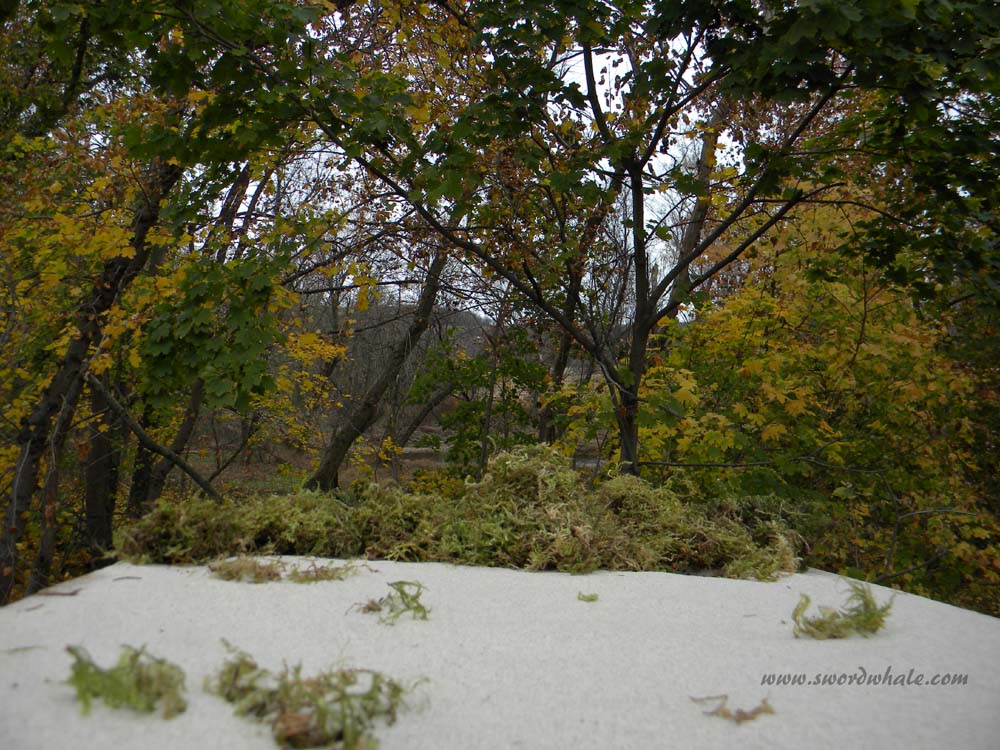
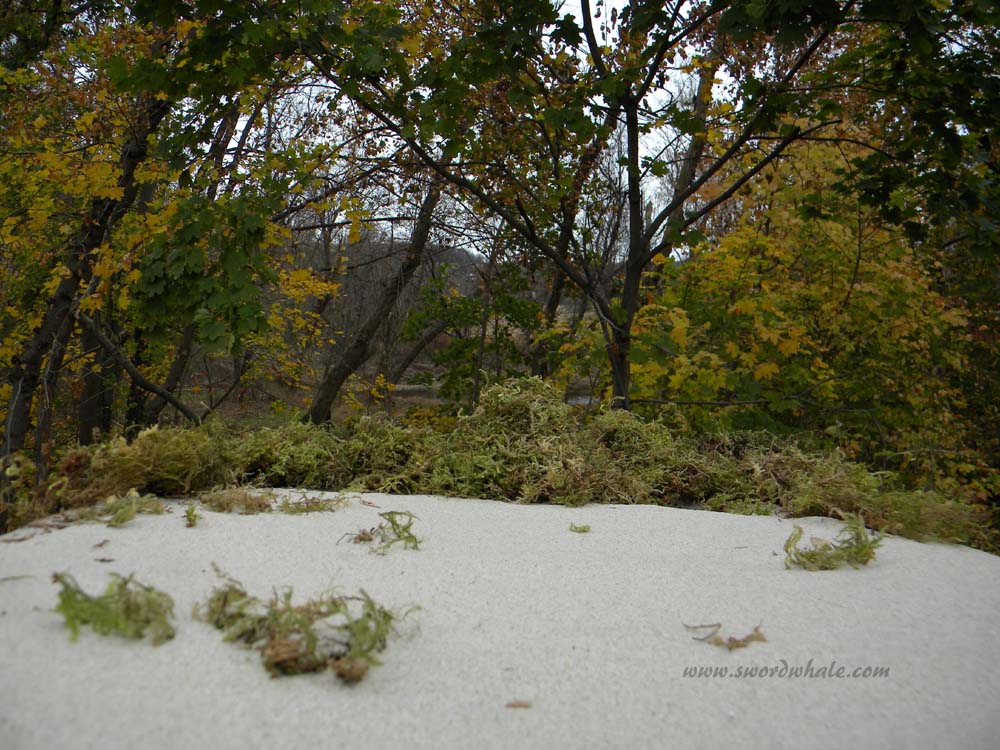
diorama land
A table, sand and reindeer moss, as well as a few rocks, can make a great foreground for Stablemates and other small horses. I used the moss and rocks as well as a few bits of bark to disguise the edges of the table.
|
|
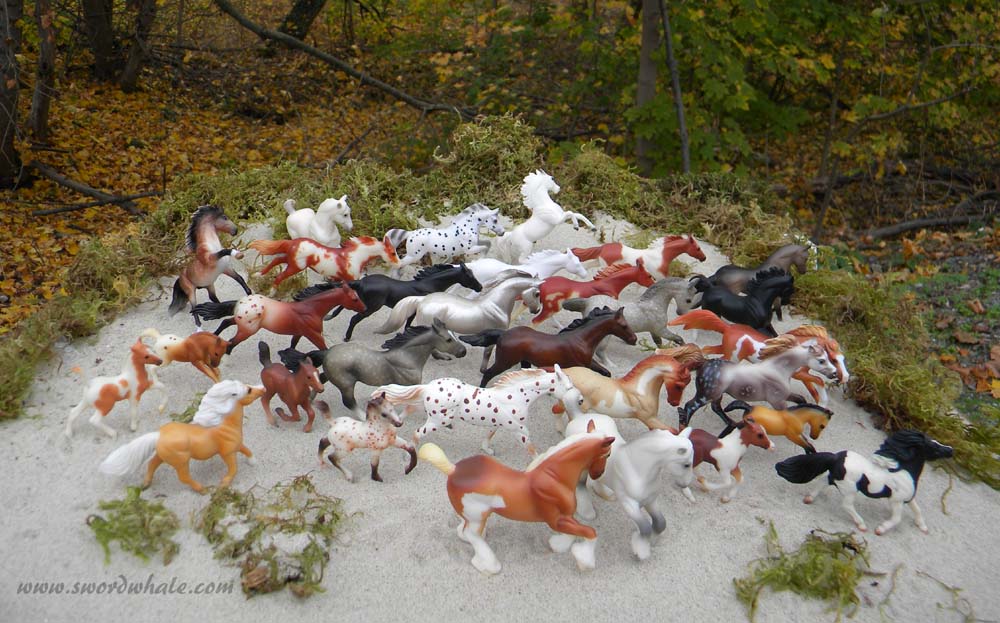
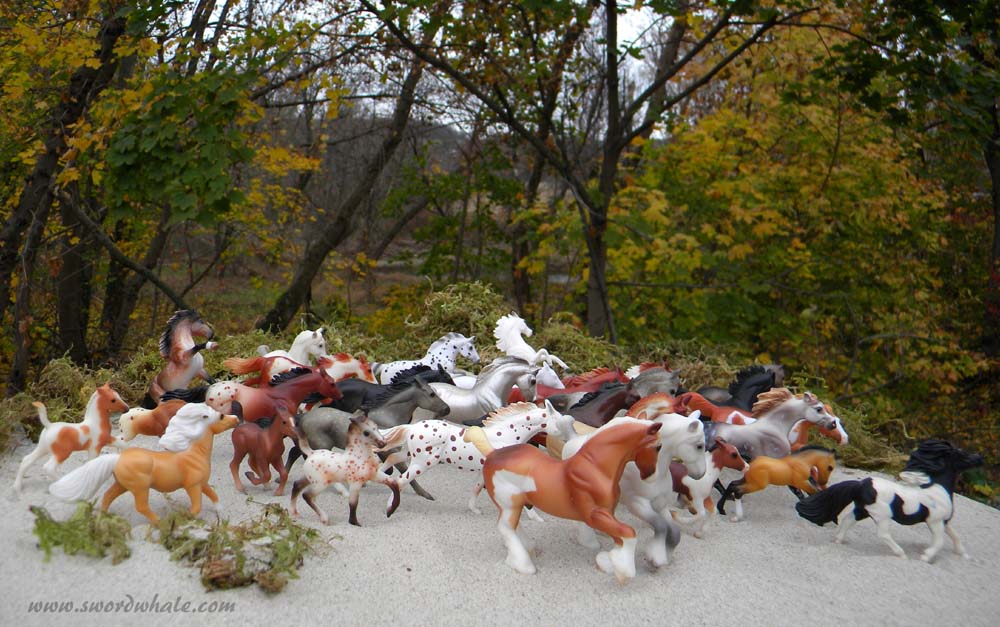
The danger is creating a "sand arena" which doesn't blend into the background. Camera angle makes a difference; a high angle shows all the horses, a low angle looks more realistic and makes the sand area blend into the background better.
|
|
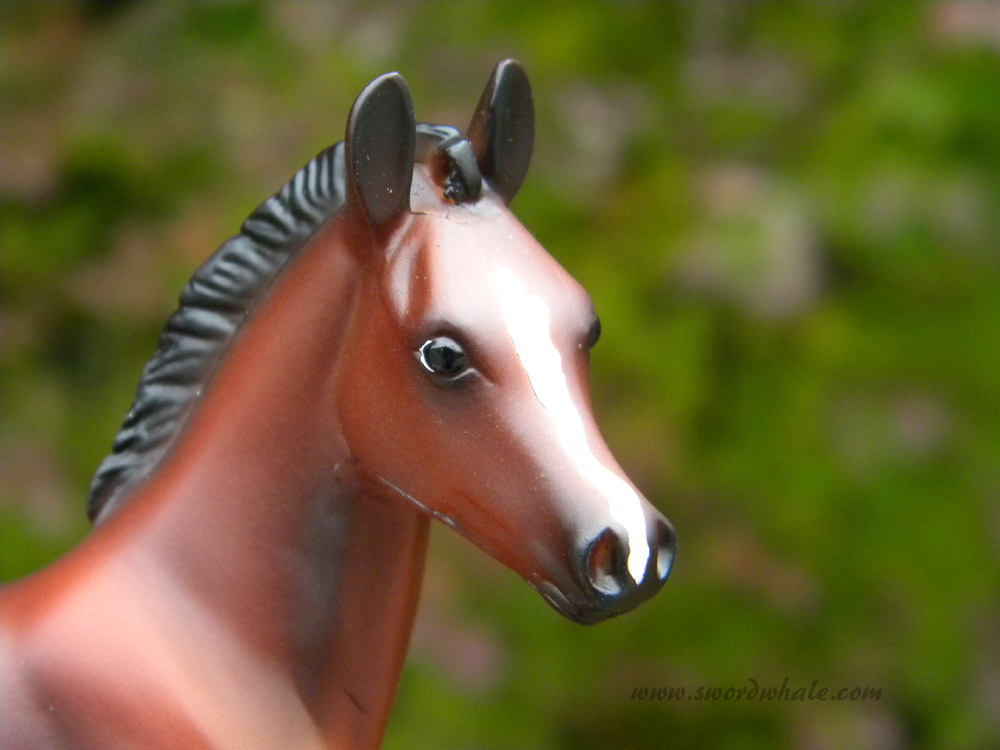
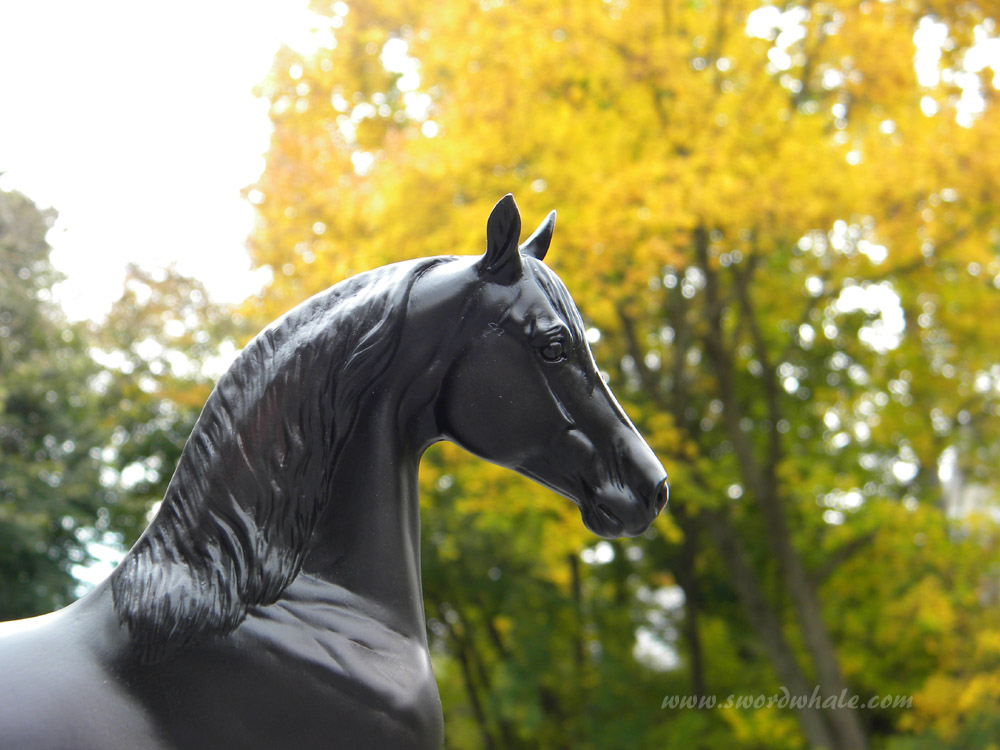
getting a head
A lot of these models are highly detailed sculptures, but as you go close-up, you lose detail, so most of the time, head shots are kind of bleah. The foal in this set is awesome, but close-up is clearly a model. (although, check out the detail of color in those nostrils). The mare is larger and more detailed.
|
|
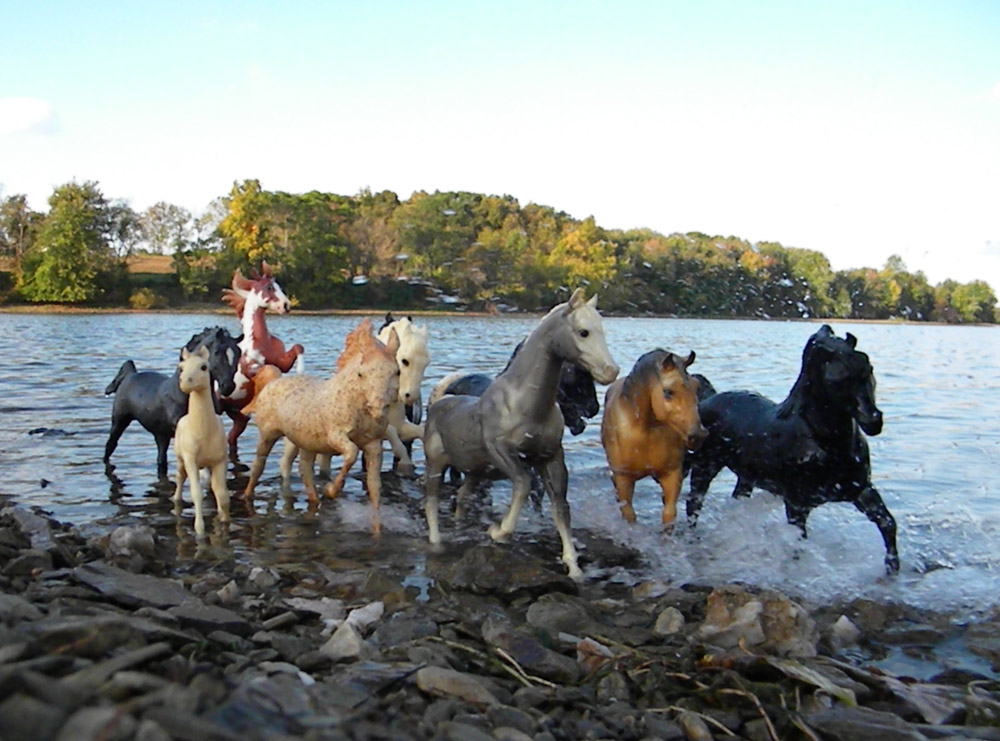
wrangling the herd: composition compostion
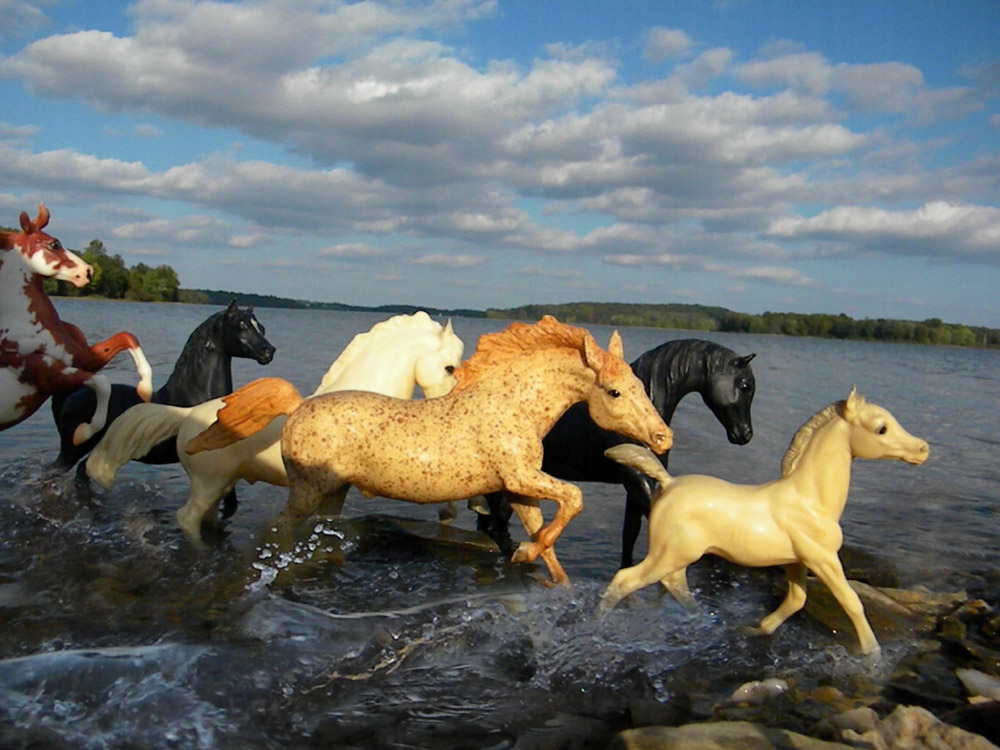
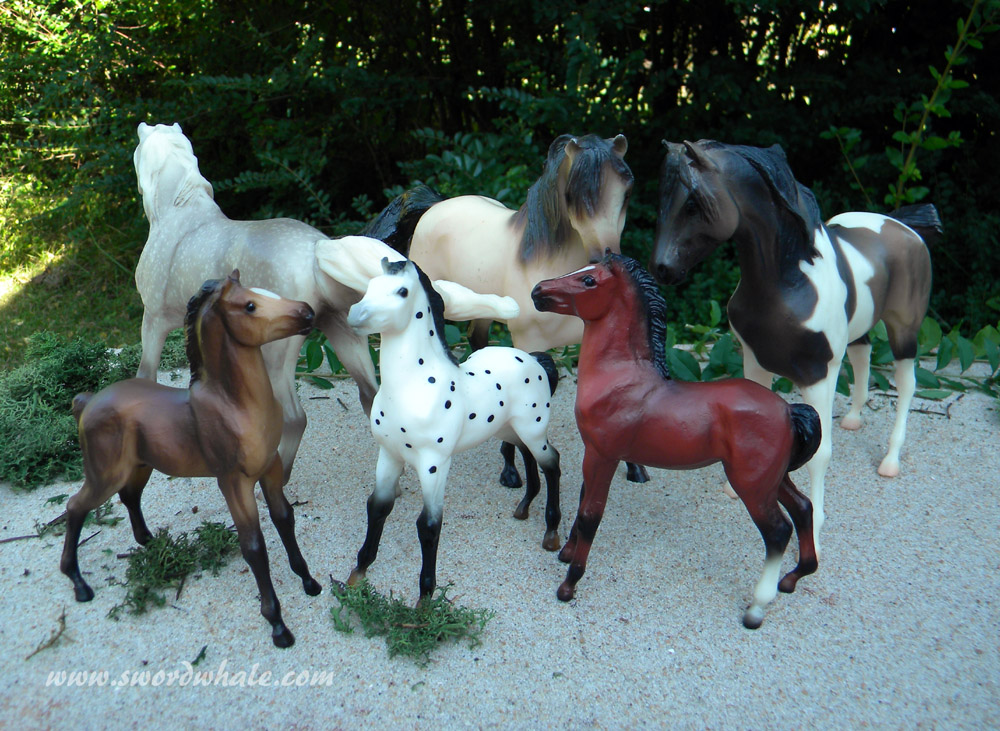
Unlike shots of real wild horses, where your choices in color and size and position may be limited,
you can choose where to put your Breyers
you can choose where to put your Breyers
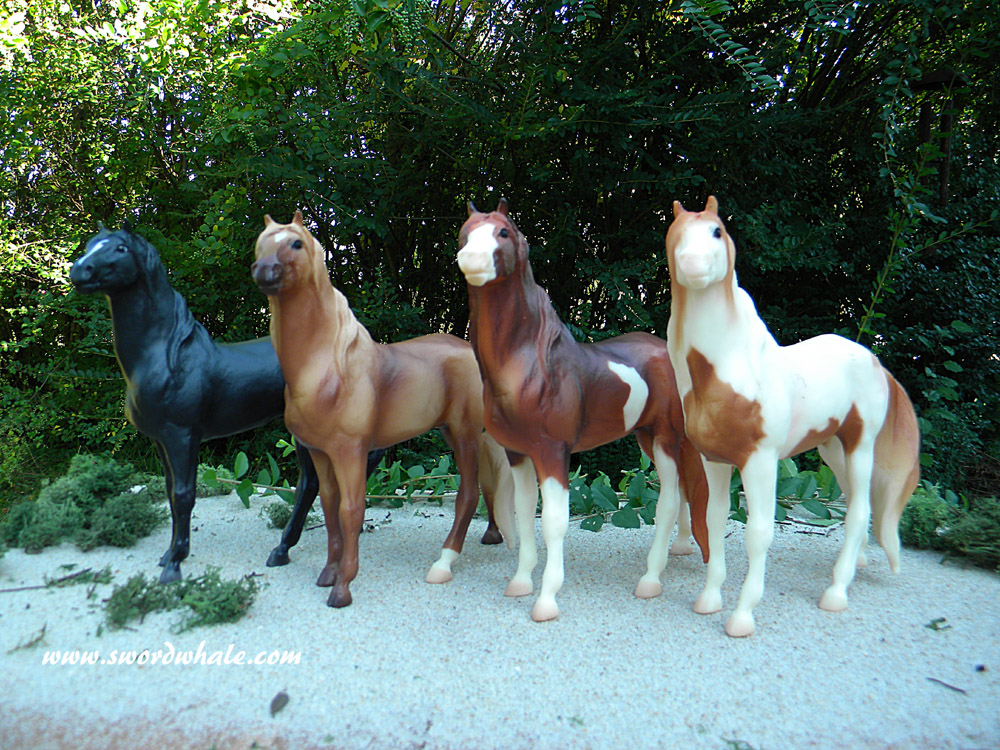
(would all the dark chestnuts with flaxen manes please stand on the left, and the red mare go to the right...)
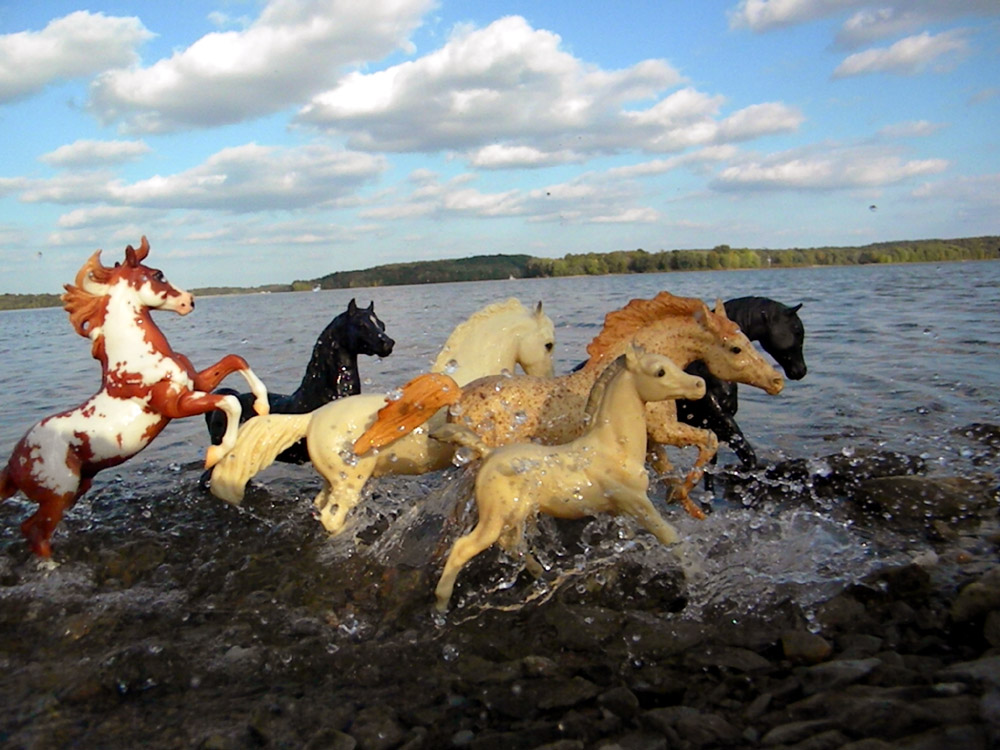
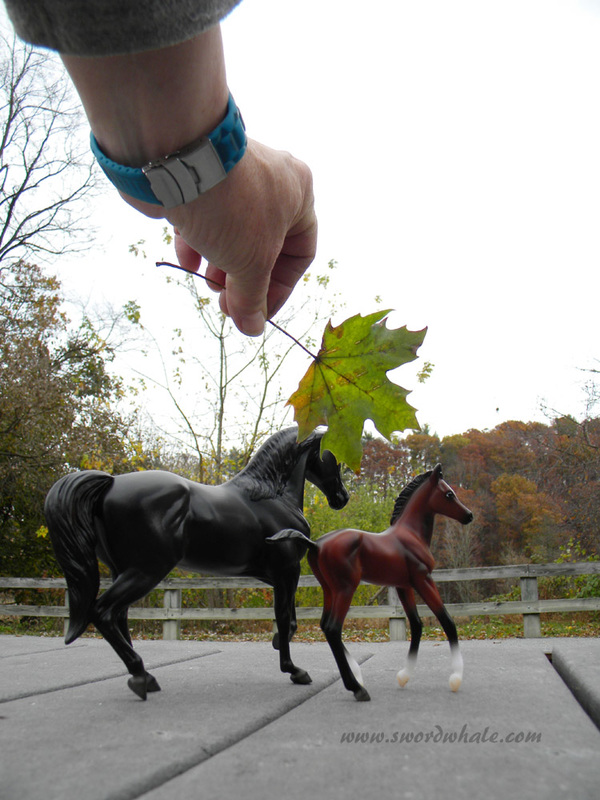
Your Breyer herd is like a palette. Like a crayon box of joy. You can put them wherever you want. Look at them from your camera's viewpoint and place sizes, colors and poses accordingly. If you want an action shot, but don't have two dozen galloping horses, put the galloping ones in front, and the less gallopy ones behind. In the shots below, at least three horses are just walking, including the Black Stallion in the lead. Two others are rearing horses, tilted so they look like they are leaping forward (use handy rocks or something). Some splashy water hides the walking feet. Sometimes all you need is a head on the other side to show there's more horses. Don't put all your black horses, or palominos, or bays, in one spot. What kind of shapes are the heads and necks making? What kind of rhythm are the legs creating? Light against dark, color against greys and blacks, pinto against solid or Appaloosa. My instinct was to raise the camera, fly it over the herd so I could see all of them, but a too high angle and they again look like... models.
Also, pay attention to close-ups. Does your model have the detail necessary to carry a close-up? Or does he look better from a distance?
Also, pay attention to close-ups. Does your model have the detail necessary to carry a close-up? Or does he look better from a distance?
special effects
- Throw stuff: a cup of water makes a splash, a handful of sand creates the illusion of the horse kicking up dirt, a bit of (dry) snow, the same
- You can make filming easier (lying on a beach when there's a sandstorm in progress is not so much fun) by having a portable table you can create a diorama on while using the real background
- a rock tossed into the water at your horses' feet also makes a good splash
- a spray bottle can create a fine mist... scale rain, or create a splash (open the nozzle for squirt not spray)
- water has scale (which is how we know the Loch Ness pic is a fake), your splashes and waves should not look like jello
- mud or dirt on them is authentic
- scale tricks: larger things in the far background will look small now (like a real rider far away is now in scale to your tiny horse model) ... a smaller model closer to the camera now matches your larger model farther away
- green screen is your friend
|
|
A bit of sand and some reindeer moss create a foreground. You can also make fence out of twigs, popsicle sticks or other items. A bit of random debris or rocks creates believable foregrounds. Careful of the crack in the folding table! And make sure your far edges are covered by moss, vegetation or rocks: no table edges!
green screen
Just like a big budget movie, you can use green screen. Paint a flat surface green (like a piece of foamcore or plywood, or get green matboard, or stretch some green cloth over a frame or flat surface). Green cloth works but beware of wrinkles... they will be a different shade of green and harder to remove from the photo.
It could be any other color, like blue, just not any of the colors in your horses (which tend to be in the red/yellow/black/white scale).
Place your subjects far enough from the green screen so it does not reflect on them.
Photograph them. Use Photoshop (or something similar) to combine the green screen horse with a background photo you've taken elsewhere. Select the green, all the shades of it (on Photoshop there's an eyedropper tool with a + that adds up all the shades you pick), invert so you now have selected the horse, copy and paste or drag it to the other photo. Use layer mask (NEVER eraser) to erase last bits of green (black erases) or return the parts you accidentally erased (white returns it). When it's perfect, flatten layers, save. Be sure the lighting in your landscape and on your horse matches... the sun can't be in two places at once.
Fuzzy areas like the edges of manes will retain green. Use the paintbrush tool in "color" mode to change the color to the horse's color or background color.
go big or go home
...or not...
Judge me by my size, would you? Get out those Schleichs, safaris, tiny Hartlands, Hagen Renakers, Stablemates and play.
finally: have fun!
A shout out to Kimberley Jacobs' fabulous Breyer costumes. I've done Arabian and medieval costumes for full sized horses, and those tassels are a pain, but... just imagine doing them for a teeny tiny 1/6 or 1/9th scale model... https://www.pinterest.com/kajac17315/16th-and-19th-model-horse-costumes/
My collection of other people's photography and models:
https://www.pinterest.com/swordwhale/horse-collection-breyer-reworked-and-original-mode/
Some ridiculously beautiful photography: http://yamnuska-studios.deviantart.com/
And more: https://www.youtube.com/watch?v=KORYgH_L0Gg
My collection of other people's photography and models:
https://www.pinterest.com/swordwhale/horse-collection-breyer-reworked-and-original-mode/
Some ridiculously beautiful photography: http://yamnuska-studios.deviantart.com/
And more: https://www.youtube.com/watch?v=KORYgH_L0Gg
